

Vitavia Athena 7000 Bedienungsanleitung
PDF-Handbuch · 56 Seiten
Deutsch



Schnelle Überprüfung
Falsche Antwort, bitte versuchen Sie es erneut.
Chatten Sie mit Ihrem Vitavia Athena 7000-Handbuch mithilfe von KI
Erhalten Sie sofortige KI-Antworten aus Ihrem Vitavia Athena 7000-Handbuch
Fragen Sie alles über Vitavia Athena 7000. Antworten stammen aus diesem Handbuch, mit den Seiten, auf denen sie basieren.
Athena 7000 Wartungsplan
Waschen Sie das Gewächshaus gelegentlich gründlich mit einem milden Reinigungsmittel. Stellen Sie sicher, dass das Reinigungsmittel nicht aggressiv mit Aluminium oder Kunststoff reagiert.
Stellen Sie sicher, dass die Türschienen regelmäßig gereinigt werden, um eine Ansammlung von Schmutz zu vermeiden.
Bitte überprüfen Sie die Festigkeit aller Muttern und Schrauben 2 Wochen nach Abschluss der Montage.
Stellen Sie eine Frage
Empfehlen Sie Athena 7000?
Ja NeinHäufig gestellte Fragen
Sie benötigen Schraubendreher, einen Gummihammer, Leitern, Schraubenschlüssel, ein Cutter-Messer, einen Messstab, eine Wasserwaage und einen Akkubohrer mit einstellbarem Drehmoment.
Ist diese Antwort hilfreich?
Ja, die Vitavia Athena unterstützt mehrere Verglasungstypen, einschließlich 4mm Glas, 10mm Polycarbonat und 16mm Polycarbonat, je nach Modellkonfiguration.
Ist diese Antwort hilfreich?
Nein, das Fundament ist nicht enthalten. Sie müssen selbst ein solides Fundament aus Beton, Mauerwerk oder Steinarbeiten konstruieren, bevor der Zusammenbau beginnt.
Ist diese Antwort hilfreich?
Kondensation kann reduziert werden, indem bestimmte Teile wie (7424/7425) durch (7423*) ersetzt werden, um die interne Belüftung zu erhöhen, insbesondere bei Polycarbonatmodellen.
Ist diese Antwort hilfreich?
Ja, die Verankerung des Gewächshauses ist für Sicherheit und Stabilität obligatorisch, insbesondere gegen Windlasten und zur Einhaltung von Versicherungsvorgaben.
Ist diese Antwort hilfreich?
Vorteile und Nachteile
Vorteile

- Robuste Aluminiumrahmenkonstruktion sorgt für langlebige Leistung
- Vielfältige Verglasungsoptionen unterstützen sowohl Glas- als auch Polycarbonatplatten
- Schiebetürdesign ermöglicht bequemen Ein- und Ausgang
- Dachlüfter bieten hervorragende natürliche Belüftung und Temperaturregelung
- Detaillierte Montageanweisungen vereinfachen den Bauprozess
Nachteile

- Erfordert ein perfekt waagerechtes und quadratisches Fundament für eine ordnungsgemäße Installation
- Der Zusammenbau erfordert typischerweise zwei Personen für Sicherheit und Effizienz
- Neutrales Silikon zur Abdichtung ist nicht im Paket enthalten
- Kondensation kann bei Polycarbonat ohne spezifische Lüftungsanpassungen auftreten
- Fundamentmaterialien werden nicht bereitgestellt und müssen separat bezogen werden
Produkt Spezifikation
Verglasung
Polykarbonat 25,4 cm (Hohlkammerplatten), Sicherheitsglas 0,76 cm (einlagig)
Rahmen
Aluminium
Farbe
Silber
Fläche
6,89 qm
Ausstattung
1 Dachfenster, Regenrinne, verschließbar
Tür
Doppelschiebetür
Abmessungen (LxBxH)
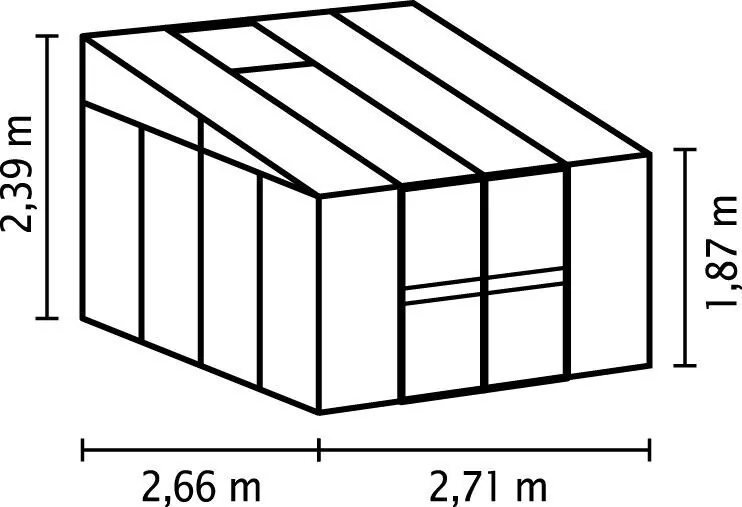
2,66x2,72x2,39 m
Produkt Beschreibung
Vitavia Athena 7000 ESG/HKP Gewächshaus Alu Handbuch
Die Vitavia Athena 7000 ist ein robustes und elegantes Gewächshaus, das für ernsthafte Gärtner entwickelt wurde, die Haltbarkeit und Stil verlangen. Aus hochwertigem Aluminium gefertigt, bietet diese Konstruktion außergewöhnliche Stärke bei gleichzeitiger Wahrung einer schlanken, modernen Ästhetik, die jeden Garten ergänzt. Das Handbuch dient als umfassender Leitfaden zur Erschließung des vollen Potenzials dieses Produkts und stellt sicher, dass Sie es mit Zuversicht und Präzision zusammenbauen können.
Der Zusammenbau beginnt mit der sorgfältigen Standortwahl. Es ist entscheidend, einen Standort zu wählen, der viel Sonnenlicht erhält, aber vor starkem Wind geschützt ist. Ein solides Fundament aus Beton, Ziegel oder Stein wird empfohlen, um Stabilität und Langlebigkeit zu gewährleisten. Das Fundament muss vor dem Beginn des Platzierens der Rahmenelemente perfekt waagerecht und quadratisch sein. Sicherheit steht während des Bauprozesses an erster Stelle; tragen Sie immer Schutzausrüstung wie Handschuhe und Schutzbrillen beim Umgang mit Aluminiumprofilen, Glas oder Polycarbonatplatten.
Die Vitavia Athena verfügt über ein Schiebetürsystem, das einfachen Zugang zu Ihren Pflanzen bietet. Der Rahmen wird Abschnitt für Abschnitt zusammengesetzt, beginnend mit den Vorderelementen und Giebelseiten. Die Anweisungen erläutern, wie Seitenelemente verbunden, Dachmittelstreben installiert und Dachlüfter für optimale Klimakontrolle eingebaut werden. Ob Sie die Einheit mit 4mm Glas oder verschiedenen Stärken von Polycarbonat verglasen, das flexible Design nimmt beide Materialien nahtlos auf. Eine ordnungsgemäße Abdichtung mit neutralem Silikon wird empfohlen, um sicherzustellen, dass das Gewächshaus wetterdicht bleibt.
Die Wartung ist einfach, aber wesentlich, um Ihr Gewächshaus in Topzustand zu halten. Regelmäßige Reinigung der Schienen und Rahmen verhindert Ansammlungen von Schmutz, was den reibungslosen Betrieb von Türen und Lüftern behindern könnte. Überprüfen Sie regelmäßig alle Muttern und Schrauben nach zwei Wochen Nutzung, um sicherzustellen, dass sie fest bleiben. Durch Befolgung dieser Richtlinien im Vitavia Athena 7000 ESG/HKP Gewächshaus Alu Handbuch schaffen Sie eine blühende Umgebung für Ihre Pflanzen für kommende Jahre.
Suche nach 67.706 Bedienungsanleitungen online


Marke oder Modell eingeben