Manual.ly Logo

SpeaKa Professional SP-MM-900 Bedienungsanleitung

0,0 · 0 Bewertungen

PDF-Handbuch · 4 Seiten

Deutsch

M: QW-35-FL
Seite

/ 4

Loading...
9570562c1ce6ad72412b9a4a80c88998b845 page 2
2
Safety Instructions
Monitor Arm
Item no: 2731200 (SP-MM-900)
Item no: 2731201 (SP-MM-910)
Item no: 2731202 (SP-MM-920)
Item no: 2731203 (SP-MM-930)
1 Intended use
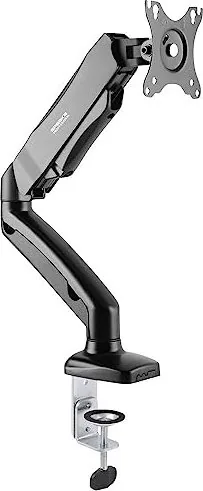
The product is a spring loaded three monitor arm with integrated hub. It secures to your table using a
clamp.
The product is intended for indoor use only. Do not use it outdoors.
Contact with moisture must be avoided under all circumstances.
If you use the product for purposes other than those described, the product may be damaged.
Improper use can result in hazards.
The product complies with the statutory national and European requirements.
For safety and approval purposes, you must not rebuild and/or modify the product.
Read the operating instructions carefully and store them in a safe place. Make this product available to
third parties only together with the operating instructions.
All company names and product names are trademarks of their respective owners. All rights reserved.
2 Delivery contents
■
Product
■
Operating instructions
3 Latest product information
Download the latest product information at www.conrad.com/downloads or scan the QR code shown. Fol-
low the instructions on the website.
4 Description of symbols
The symbol warns of hazards that can lead to personal injury.
5 Safety instructions
Read the operating instructions carefully and especially observe the safety informa-
tion. If you do not follow the safety instructions and information on proper handling,
we assume no liability for any resulting personal injury or damage to property. Such
cases will invalidate the warranty/guarantee.
5.1 General
■
The product is not a toy. Keep it out of the reach of children and pets.
■
Do not leave packaging material lying around carelessly. This may become dangerous playing mater-
ial for children.
■
If you have questions which remain unanswered by this information product, contact our technical
support service or other technical personnel.
■
Maintenance, modifications and repairs must only be completed by a technician or an authorised re-
pair centre.
5.2 Handling
■
Handle the product carefully. Jolts, impacts or a fall even from a low height can damage the product.
5.3 Operating environment
■
Do not place the product under any mechanical stress.
■
Protect the appliance from extreme temperatures, strong jolts, flammable gases, steam and solvents.
■
Protect the product from high humidity and moisture.
■
Protect the product from direct sunlight.
5.4 Operation
■
Consult an expert when in doubt about the operation, safety or connection of the product.
■
If it is no longer possible to operate the product safely, take it out of operation and protect it from any
accidental use. DO NOT attempt to repair the product yourself. Safe operation can no longer be guar-
anteed if the product:
– is visibly damaged,
– is no longer working properly,
– has been stored for extended periods in poor ambient conditions or
– has been subjected to any serious transport-related stresses.
5.5 Connected devices
■
Also observe the safety and operating instructions of any other devices which are connected to the
product.
5.6 Installation location
■
Select an installation location for the monitor holder and any supplied accessories that facilitates safe
and ergonomic use.
5.7 Before assembly and installation
■
Verify that the delivery content is complete before assembling the monitor holder and accessories. Do
not assemble if any parts are missing.
■
Prevent damage to the monitor. Refer to the manufacturer instructions that came with the monitor to
find out how and where to attach a monitor holder or monitor mount.
■
Handle the monitor and screen with care. Always lay the monitor flat and use a pad or cloth to protect
the table surface and monitor from damage.
■
Risk of injury and/or damage when unpacking the spring loaded arm! Hold each spring arm together
while someone else cuts the zip tie. Slowly release the pressure on the spring arms and open slowly
to full length.
5.8 Table mounting
If you mount the monitor holder on a table:
■
Attach the monitor holder only to a sufficiently stable, horizontal table top. Tables made of glass,
ceramic or stone slabs or thin plastic-coated wooden-fibre slabs, are categorically unsuitable for at-
tachments. Furthermore, you must not attach the monitor holder to shelves or similar unstable or un-
steady surfaces.
■
Attach the monitor holder only at a position on the table top that is suitable for this purpose. Consider
the significant lever action involved!
■
The weight of the monitor and monitor holder as well as its fixed position and significant lever action
can all cause pressure marks on the table top. For this reason, we do not recommend that you mount
it on valuable furniture items!
■
For safety reasons, the monitor holder and the monitor that is attached to it should be situated only
above the table surface. The design of many monitor holders means that it is not suitable for the mon-
itor arm to be situated anywhere other than above the table surface. There is also a danger of it top-
pling over in certain circumstances!
■
Ensure that the monitor holder is fixed to the table top securely. Otherwise it could slip off the table
top when you are moving the monitor and the monitor holder. As well as causing material damage,
this poses a danger of personal injury!
5.9 Removing a monitor
■
Risk of injury and/or damage from spring loaded arm! Before removing an attached monitor, always
set the front arm to the highest position so it cannot "spring up" after the monitor is removed.
6 Maintenance
■
Adjusting the positions of the monitor and the monitor mount can cause the screws to become loose
over time. Check all the screw fittings from time to time.
7 Cleaning and care
Important:
– Do not use aggressive cleaning agents, rubbing alcohol or other chemical solutions. They damage
the housing and can cause the product to malfunction.
– Do not immerse the product in water.
1. Disconnect the product from the power supply.
2. Clean the product with a dry, fibre-free cloth.
8 Technical data
8.1 Base
Item No.:
2731200 2731201 2731202
Model No.: SP-MM-900 SP-MM-910 SP-MM-920
Grommet* 10 – 85 mm 10 – 83 mm 10 – 85 mm
C-Clamp* 10 – 85 mm 10 – 83 mm 10 – 80 mm
*These values indicate the min./max. table thickness the grommet and c-clamp can fit.
8.2 Monitor arm
Item No.:
2731200 2731201 2731202 2731203
Model No.: SP-MM-900 SP-MM-910 SP-MM-920 SP-MM-930
Number of monit-
ors
1 2 1 2
Capacity per
monitor
2 - 9 kg 1 - 9 kg
VESA
compatible
75 x 75, 100 x 100
Monitor size 43.2 – 81.3 cm (17 - 32") 33.02 – 81.3 cm (13 - 32")
8.3 General
Item No.:
2731200 2731201 2731202 2731203
Model No.: SP-MM-900 SP-MM-910 SP-MM-920 SP-MM-930
Dimensions 117 x 468 x 570
mm
942 x 112 x 570
mm
115 x 590 x 665
mm
1100x 125 x 670
mm
Weight* 2.05 kg 3.57 kg 3.1 kg 6.03 kg
This is a publication by Conrad Electronic SE, Klaus-Conrad-Str. 1, D-92240 Hirschau (www.conrad.com).
All rights including translation reserved. Reproduction by any method (e.g. photocopying, microfilming or the capture in
electronic data processing systems) requires prior written approval from the editor. Reprinting, also in part, is prohibited.
This publication reflects the technical status at the time of printing.
Copyright by Conrad Electronic SE.
*2731200, 2731201, 2731202, 2731203_V2_0323_dh_ss_en 18014399307966475-2 I3/O2 en

Chatten Sie mit Ihrem SpeaKa Professional SP-MM-900-Handbuch mithilfe von KI

Erhalten Sie sofortige KI-Antworten aus Ihrem SpeaKa Professional SP-MM-900-Handbuch

Fragen Sie alles über SpeaKa Professional SP-MM-900. Antworten stammen aus diesem Handbuch, mit den Seiten, auf denen sie basieren.

SP-MM-900 Wartungsplan

Regelmäßig
Alle Schraubverbindungen prüfen

Das Einstellen der Monitorpositionen kann dazu führen, dass sich die Schrauben im Laufe der Zeit lockern. Prüfen Sie alle Schraubverbindungen von Zeit zu Zeit.

Bei Bedarf
Produkt reinigen

Trennen Sie das Gerät vom Stromnetz und reinigen Sie es mit einem trockenen, fusselfreien Tuch. Verwenden Sie keine aggressiven Reinigungsmittel und tauchen Sie das Gerät nicht in Wasser ein.

M: qwen/qwen3.8-flash

Stellen Sie eine Frage

0/1000

Empfehlen Sie SP-MM-900?

Ja Nein

Häufig gestellte Fragen

A

Nein, dieses Produkt ist ausschließlich für den Innenbereich bestimmt. Feuchtigkeit und Wettereinwirkungen können den Mechanismus beschädigen.

Ist diese Antwort hilfreich?

A

Verwenden Sie stabile, waagerechte Tischoberflächen. Vermeiden Sie Glas, Keramik, Stein oder dünn Kunststoff beschichtetes Holz.

Ist diese Antwort hilfreich?

A

Verwenden Sie ein trockenes, fusselfreies Tuch. Verwenden Sie keine aggressiven Reinigungsmittel oder Wassertauchen.

Ist diese Antwort hilfreich?

A

Ja, die SpeaKa Professional SP-MM-900 Anleitung ist Teil des Lieferumfangs.

Ist diese Antwort hilfreich?

A

Nein, versuchen Sie nicht, das Produkt selbst zu reparieren. Konsultieren Sie einen Techniker für Wartung.

Ist diese Antwort hilfreich?

A

VESA 75x75 und 100x100 kompatible Monitore zwischen 17 und 32 Zoll passen.

Ist diese Antwort hilfreich?

A

Ja, die Federbelastung hängt vom Monitoregewicht ab. Prüfen Sie im Handbuch nach den Grenzen.

Ist diese Antwort hilfreich?

M: QW-35-FL

Vorteile und Nachteile

Vorteile

  • Integrierter Hub bietet nahtloses Kabelmanagement und Stabilität
  • Federbelastetes Design ermöglicht mühelose Monitor-Neupositionierung
  • Robuste Klemme passt sich sicher an verschiedene Tischdicken an
  • VESA-Kompatibilität funktioniert mit Standard-Monitor-Befestigungsmustern
  • Kompaktes Design spart wertvollen Schreibtischplatz
VS

Nachteile

  • Ausschließlich für den Innenbereich bestimmt, verhindert Außentauglichkeit
  • Schwere Monitore können die Spannungsbalance beeinflussen
  • Erfordert stabilen Tisch, um Kippgefahren zu verhindern
  • Federspannungseinstellung muss vorsichtig durchgeführt werden
  • Nicht geeignet für Glas- oder Keramik-Tische
M: QW-35-FL

Produkt Spezifikation

Typ

Schreibtisch

Anzahl der Monitore

1

Bildschirmgröße

43,18-81,28 cm

Verstellbarkeit

Neigung (-45 deg, +90 deg), Rotation (180 deg), Schwenken (180 deg), Höhenverstellbar

Maximale Last

9,00 kg

VESA

75x75, 100x100

Merkmale

Gasfeder, Kabelmanagement

Farbe

Schwarz

Abmessungen (BxHxT)

46,81x57,00x11,71 cm

Gewicht

2,05 kg

M: QW-35-FL

Produkt Beschreibung

Ihren Arbeitsbereich mit dem SpeaKa Professional SP-MM-900 aufwerten

Transformieren Sie Ihr Bürosetup mit dem SpeaKa Professional SP-MM-900 Monitorarm. Dieser federbelastete Arm wurde für eine nahtlose Integration in Ihren täglichen Arbeitsablauf entwickelt. Er verfügt über einen integrierten Hub und wird mit einer robusten Klemme an Ihrem Tisch befestigt. Egal ob Sie komplexe Datensätze verwalten oder visuelle Inhalte erstellen, eine Display-Positionierung auf der perfekten Höhe reduziert den Nackenstress erheblich. Dieses Produkt ist ausschließlich für den Innenbereich bestimmt und wurde entwickelt, um täglichen Betriebsanforderungen im Büroumfeld standzuhalten. Es bietet Flexibilität, ohne die Stabilität zu beeinträchtigen.

Warum diesen Monitorarm wählen?

Ergonomie ist der Schlüssel für langfristige Produktivität und Gesundheit. Der SpeaKa Professional SP-MM-900 ermöglicht eine sanfte Höhenverstellung und hält Ihren Desktop frei von Unordnung. VESA-Kompatibilität sorgt dafür, dass Sie die meisten Standardmonitore sicher montieren können. Detaillierte Installationsschritte finden Sie in der SpeaKa Professional SP-MM-900 Anleitung. Das Lesen dieses Handbuchs gewährleistet, dass Sie die Lebensdauer Ihrer Ausrüstung maximieren und potenzielle Verletzungen während der Montage vermeiden. Geeignete Handhabung verhindert versehentliches Herunterfallen oder strukturelle Schäden an der Tischoberfläche. Der Klemmmechanismus passt sich effektiv an verschiedene Tischdicken an.

Sicherheits- und Wartungshinweise

Sicherheit hat bei der Verwendung von Federmechanismen an Möbeln oberste Priorität. Stellen Sie vor dem Auspacken sicher, dass die Arme zusammengehalten werden, um zu verhindern, dass sich die Feder unerwartet löst und eine Verletzung verursacht. Befestigen Sie das Gerät immer auf einer stabilen, waagerechten Tischoberfläche. Vermeiden Sie Glas- oder Keramikoberflächen, die unter Druck verrutschen oder brechen können. Das Produkt muss vor Feuchtigkeit und direkter Sonneneinstrahlung geschützt werden, um die Haltbarkeit zu erhalten. Regelmäßige Wartung beinhaltet das Überprüfen der Schraubenverbindungen, um die Stabilität über die Zeit zu gewährleisten. Die Reinigung erfordert ein trockenes, fusselfreies Tuch, um die Oberfläche zu schützen. Verwenden Sie niemals chemische Lösungen oder tauchen Sie das Gerät in Wasser. Trennen Sie bei angeschlossenem Gerät die Stromversorgung, falls erforderlich. Schützen Sie es vor extremen Temperaturen.

Abschließende Gedanken zur Montage

Die Organisation Ihres visuellen Raums verbessert die Konzentration und den professionellen Komfort. Dieser Arm unterstützt Monitore innerhalb spezifischer Gewichtsgrenzen und sorgt für einen sicheren Betrieb über Jahre. Denken Sie daran, die bereitgestellten Anweisungen zu konsultieren, um spezifische Gewichtskapazitäten und VESA-Muster zu ermitteln. Durch die Einhaltung ordnungsgemäßer Installationsprotokolle erhalten Sie die Garantievalidität und die Benutzersicherheit bei. Ihr Arbeitsplatz verdient ein professionelles Upgrade, das Stil mit funktioneller Praktikabilität für moderne Büros kombiniert. Investieren Sie in eine Lösung, die mit Ihren Bedürfnissen wächst und Sie über lange Arbeitstage hinweg komfortabel hält. Priorisieren Sie die Sicherheit und genießen Sie die Freiheit einstellbarer Blickwinkel, um Ihre tägliche Arbeit effektiv zu verbessern.

Wichtige Hinweise

Halten Sie Verpackungsmaterialien von Kindern und Haustieren fern, da sie gefährlich sein können. Überprüfen Sie die Lieferinhalte vor Beginn der Montage, um sicherzustellen, dass alle Komponenten vorhanden sind. Kontaktieren Sie den technischen Support für unbeantwortete Fragen bezüglich Installation oder Nutzung. Die Garantie kann erlöschen, wenn nicht genehmigte Änderungen versucht werden.

M: QW-35-FL

© Copyright 2026 Manual.ly
