
Nolan N100-5 Bedienungsanleitung
PDF-Handbuch · 116 Seiten
Deutsch



Schnelle Überprüfung
Falsche Antwort, bitte versuchen Sie es erneut.
Chatten Sie mit Ihrem Nolan N100-5-Handbuch mithilfe von KI
Erhalten Sie sofortige KI-Antworten aus Ihrem Nolan N100-5-Handbuch
Fragen Sie alles über Nolan N100-5. Antworten stammen aus diesem Handbuch, mit den Seiten, auf denen sie basieren.
N100-5 Wartungsplan
Lassen Sie den Helm nach der Verwendung an einem gut belüfteten Ort mit offenem Visier trocknen. Von Hitzequellen fernhalten.
Innenscheibe entfernen und vorsichtig mit neutraler Flüssigseife und feuchtem Tuch reinigen. Unter fließendem Wasser abspülen.
Überprüfen Sie regelmäßig die korrekte Spannung, um Bewegung und Kratzer auf Oberflächen zu verhindern.
Wenn das Visier beschädigt oder stark gekratzt ist und die Sicht beeinträchtigt, ersetzen Sie es sofort.
Nur von Hand in lauwarmem Wasser (max. 30 C) mit neutraler Seife waschen. Nicht in der Maschine waschen.
Stellen Sie eine Frage
Empfehlen Sie N100-5?
Ja NeinHäufig gestellte Fragen
Es ist ein modularer Motorradhelm mit hochklappbarem Kinnbügel, Visiersystem, internem Sonnenschutz und komfortorientierten Funktionen für den täglichen Straßeneinsatz.
Ist diese Antwort hilfreich?
Die auffällige High-Visibility-Oberfläche hilft dem Fahrer, im Verkehr leichter wahrgenommen zu werden, was besonders in belebten Stadtgebieten, bei schlechtem Licht oder wechselhaftem Wetter hilfreich sein kann.
Ist diese Antwort hilfreich?
Der Kinnbügel nutzt einen zweistufigen Öffnungsmechanismus mit separaten Entriegelungs- und Öffnungshebeln. Das erleichtert die Einhandbedienung und hilft, ein unbeabsichtigtes Öffnen zu reduzieren.
Ist diese Antwort hilfreich?
Ja. Der Helm unterstützt eine minimale Öffnungsposition des Visiers für die Luftzirkulation und kann außerdem mit einem Pinlock-Innenvisier verwendet werden, um die Beschlagresistenz bei feuchten oder kalten Bedingungen zu verbessern.
Ist diese Antwort hilfreich?
Ja. Die Wangenpolster, die Nackenrolle und das Innenfutter sind herausnehmbar, was die Reinigung erleichtert und dabei hilft, Passform und Frische im Inneren langfristig zu erhalten.
Ist diese Antwort hilfreich?
Ja. Der Helm ist für N-Com-Kommunikationssysteme vorbereitet, je nach Version. Bei der Installation kompatibler Komponenten müssen möglicherweise einige innere Schaumteile entfernt werden.
Ist diese Antwort hilfreich?
Vorteile und Nachteile
Vorteile

- Dual-Action-Kinnbügel erhöht den Komfort und hilft, unbeabsichtigtes Öffnen zu verhindern.
- High-Visibility-Design verbessert die Sichtbarkeit des Fahrers im Verkehr und bei schlechten Lichtverhältnissen.
- VPS-Sonnenblende und optionales Pinlock unterstützen eine bessere Sicht bei wechselhaftem Wetter.
- Herausnehmbares Polster und Belüftungssystem verbessern den Komfort und erleichtern die Pflege.
Nachteile

- Das modulare Design kann komplexer wirken als ein einfacher Integralhelm.
- Visier-, VPS- und Pinlock-Teile müssen sorgfältig behandelt werden, um Kratzer oder Verschleiß zu vermeiden.
- Der Schutz hängt von der richtigen Passform und korrektem Verschluss ab, daher ist die Größenwahl sehr wichtig.
- Einige Zubehörteile und Funktionen können je nach Version variieren oder eine separate Montage erfordern.
Produkt Spezifikation
Typ
Modularhelm
Eigenschaften
Integrierte Sonnenblende
Gewicht
1,65 kg
Produkt Beschreibung
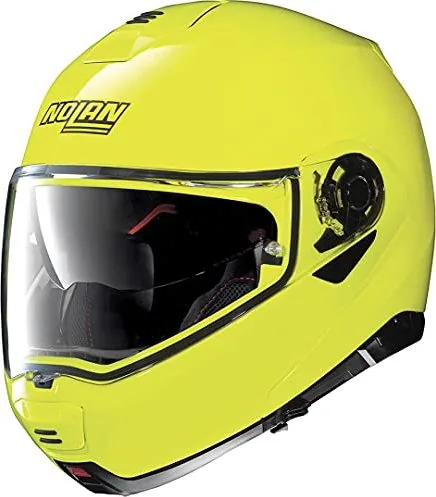
Nolan N100-5 Hi-Visibility (verschiedene Größen)
Der Nolan N100-5 Hi-Visibility wurde für Fahrer entwickelt, die einen praktischen Klapphelm mit starkem Fokus auf Sicherheit, Sichtbarkeit und Alltagskomfort suchen. Er ist für den Motorradgebrauch konzipiert und kombiniert einen hochklappbaren Kinnbügel, ein klares Visiersystem und eine auffällige High-Visibility-Oberfläche, die den Fahrer im Verkehr besser sichtbar macht. Das Gesamtbild ist modern, funktional und auf den realen Fahralltag ausgelegt.
Eines seiner herausragenden Merkmale ist das Dual-Action-Kinnbügelsystem. Dieser Mechanismus ist so konzipiert, dass er sich einhändig öffnen lässt und gleichzeitig das Risiko eines unbeabsichtigten Öffnens reduziert. Fahrer können zwischen einer vollständig geschlossenen Konfiguration für maximalen Schutz und einer offenen Konfiguration für mehr Komfort bei Stopps oder im langsameren Verkehr wechseln. Diese Flexibilität macht den Helm sowohl für Pendler als auch für Tourenfahrer attraktiv.
Auch die Sichtbarkeit ist eine große Stärke. Der Helm unterstützt ein Standard-Außenvisier, eine minimale Öffnungsposition für Luftzirkulation und Entfogung sowie eine innere VPS-Sonnenblende für helle Bedingungen. Für Fahrer, die mit wechselndem Wetter zu tun haben, bietet das optionale Pinlock-Innenschild zusätzlichen Schutz gegen Beschlagen. Zusammen helfen diese Elemente dabei, die Sicht auf die Straße klarer zu halten, wenn die Temperaturen sinken, die Luftfeuchtigkeit steigt oder die Sonne stark blendet.
Komfort und Anpassungsfähigkeit werden ebenfalls ernst genommen. Das herausnehmbare Innenpolster, die Wangenpolster und die Nackenrolle verbessern die Passform und erleichtern die Reinigung. Das Belüftungssystem hilft, frische Luft durch den Helm zu leiten, Hitzestau zu reduzieren und das Beschlagen des Visiers zu begrenzen. Außerdem ist der Helm für N-Com-Kommunikationssysteme vorbereitet und damit eine smarte Wahl für Fahrer, die verbunden bleiben möchten, ohne auf Komfort zu verzichten.
Hinweise
- Besonders geeignet für Fahrer, die einen Klapphelm mit hoher Alltagstauglichkeit suchen.
- In verschiedenen Größen erhältlich, daher sollte die Passform sorgfältig auf Stabilität und Komfort geprüft werden.
- Befolgen Sie die Reinigungs- und Pflegehinweise, um Visier, Polster und Sonnenblende zu schützen.
- Die regelmäßige Kontrolle von Riemen, Visierteilen und Verriegelungen hilft, die Leistung langfristig zu erhalten.
- Die High-Visibility-Gestaltung bietet einen praktischen Sicherheitsvorteil im dichten Verkehr und bei schlechten Lichtverhältnissen.
Suche nach 67.706 Bedienungsanleitungen online


Marke oder Modell eingeben